How long do architectural shingles last?

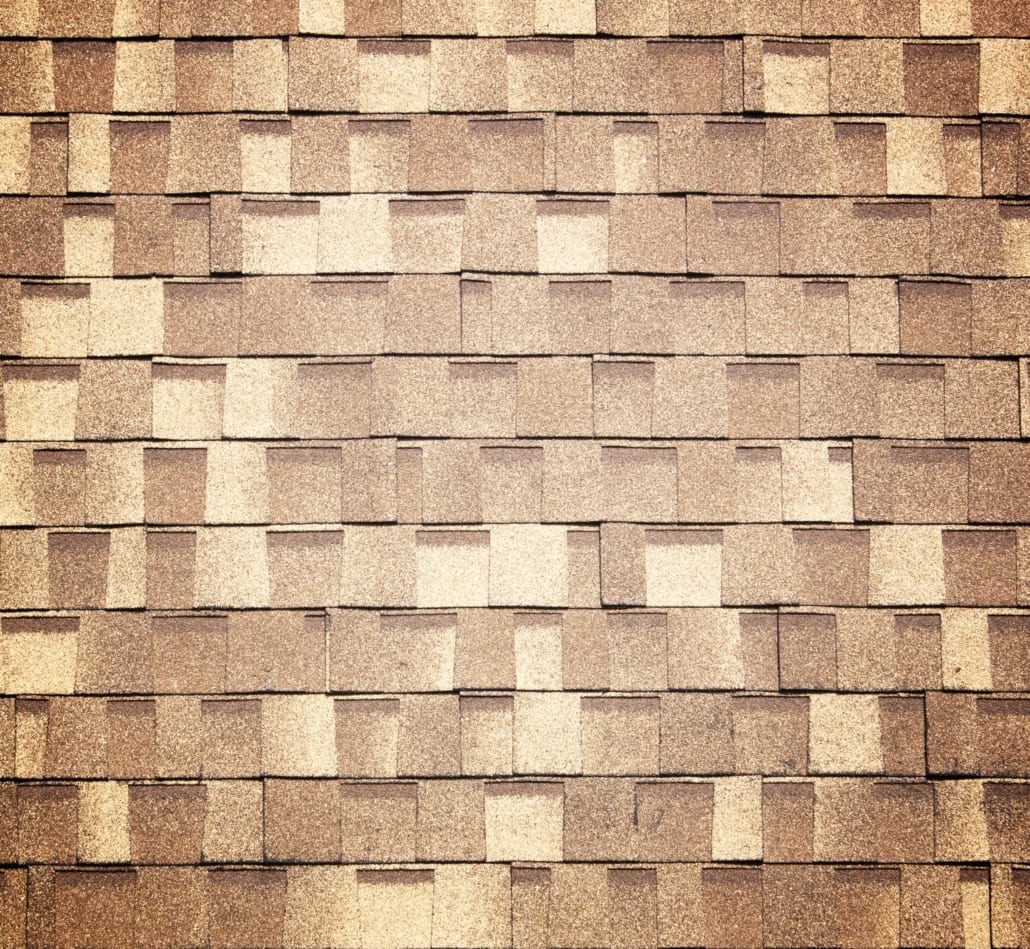
Shingles on the roof are important as they protect the roof and house. There are various types and they come in different styles and sometimes different colors. Architectural shingles, or dimensional are one type and they can last 15-30 years, depending on the environment and maintenance. 

One home you look at may have wood, while another may have metal, or have architectural shingles or more.  In all, you want to make sure the home has shingles that will last and be good for the climate you live in. They are a costly investment, but necessary to keep your loved ones safe.

Let’s take a look at architectural shingles and why they are better than three-tab, life expectancy, when a replacement may occur, the cost versus other types of shingles, and wind mitigation.

Why Architectural Shingles Are Better Than Three Tab

Three tab shingles are popular on homes but architectural shingles are better for many reasons. 

  • They are dimensional shingles in shape and can weigh 50 percent more than three tab.
  • Architectural also have multiple layers of asphalt and then are laminated so they are more durable.
  • Sporting a more appealing look and color material, they come in various sizes and colors.
  • Even though they are more expensive ($250-400 per square), many people like them because they are replicas of wood, slate, and other attractive roofing, just without the high cost 

On the other hand, three tab shingles are more popular because they are:

  • Made of a lighter and thinner material of asphalt that can shed water.
  • One of the most common types of roofing material and affordable (averaging $70 to $150 per square).
  • Lightweight, come in one shingle tab size with three tabs, and 12 inches wide.

Life Expectancy of Architectural Shingles and Three Tab

Depending on the location of the home in the U.S., the life expectancy of the architectural shingles can vary.  Manufacturers project they will last 30 years. However, Florida and the southern half the U.S have high heat and major storms and hurricanes that can damage these shingles easily. Unfortunately, this lowers their lifespan. 

On a good note, architectural shingles are made to withstand wind uplift of 110 mph and can stay on in wind uplift of 130 mph with a special roof bracing.  Even though the northern climates have snow and ice, the weather in the south has more of an impact on the shingles.

Three tab shingles on the other hand in optimal conditions can last up to 30 years. Seven to ten years is the expectancy in severe weather areas, but 18-20 years is the average in milder climates. These work well in temperate climates, but not areas subject to hurricanes. This is because the wind uplift is 60-70 miles per hour.  Unfortunately, they fail prematurely when in long-term indirect sunlight and temperature changes that can be seen in the southern part of the U.S. and the desert areas. 

When should you expect to replace shingles?

As stated above, shingles have specific life expectancy. Nachi reports roofs last about 15-20 years but it depends on the installation, the weather makers, and climate that affect the roof.  

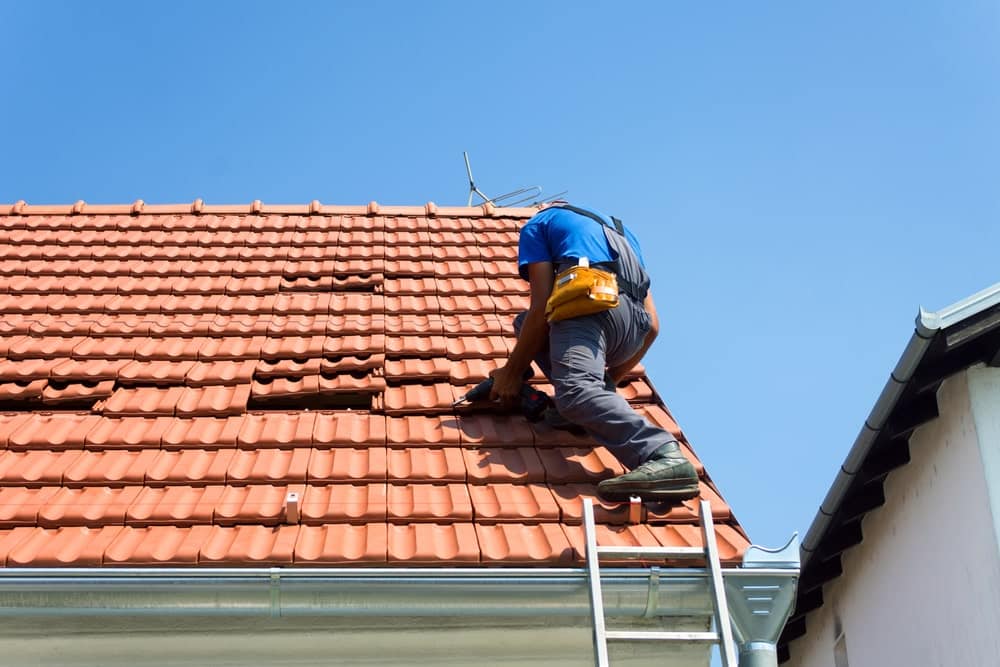
After heavy storms, take a look at the roof and make sure no shingles are missing.  Then, check to see that none of the shingles are coming up, buckled, warped or dried. If you see any of this, contact a home inspector to inspect the roof for you.

Check the gutters as well and make sure the granules are not washing into there.  This can also be a sign that it is time to replace the roof and/or shingles.  A home inspector can come out and check this also and then refer you to a professional.

Why you can expect less life expectancy than what the label says

Unfortunately, people need to make money and some roofers will try to upsell shingles.  You will be told that life expectancy is much higher than what the truth is. It will also depend on the weather and climate as to how long the shingles will last. Stormier and hotter years cause the shingles to damage and replacement may be earlier than expected.  

This is why researching various types of shingles is important.  Also, researching home inspectors, reading reviews, and finding one who is reputable is essential. They can diagnose the issue and then refer you to a professional company.

Cost of Architectural Shingles Versus Others

Architectural shingles are thicker, heavier material, and average between $250-400 per square feet.  Aesthetically appealing and help increase the value of the home due to the varieties offered in color and style.

Wood shingles– $250-$600 per square feet and require a lot of maintenance and do fade over time or change colors.  They are insect and rot-resistant, great in warmer climates, and look wonderful on cottage and Tudor style homes.

Clay Tiles– $600-$800 per square foot and made of terra cotta material which is heavier than a three tab. They look nice and usually seen in the south and southwestern states.

clay tiles for roof

Metal Roofing– Averages about $115 per square foot for aluminum or steel, all the way to $900 per square feet for stone coated steel and standing-seam copper panels.  Great in states with snow as it slides right off the roof!

Slate Time Roof– $600-$1500 per square foot and seen on mansions and premiere homes due to requiring rafters that are strengthened to hold them.  They are very heavy and won’t withstand regular home rafters.

Three tab– $70-$150 per square foot and the most common on homes in the U.S.  The cheapest and least appealing roof, but easier to find and install. This type saves the homeowner money.

Wind Mitigation Inspection

In Florida, homes must be able to withstand hurricanes or at least have the proper materials in place to do so.  Wind Mitigation is an inspection that is conducted to save the homeowner money on insurance after a home inspection.  After hurricanes in the early 2000s caused a lot of damage in Florida, insurance companies began to require the inspection to issue new mortgages. 

Current homeowners can have the inspection done and save a lot on their windstorm deductible.  Insurance companies want homeowners to have the proper safety measures in place to hopefully have less damage than in previous years. Composition shingles and tiles are the most common types of roofs in Florida.  However, the attachment to the roof deck must be with nails, not staples. Hip roofs are better with the wind than gable roofs, and the roof deck must attach to the framing.

Conclusion

There are a lot of choices for shingles for the roof and choosing ones that will withstand the climate in your part of the U.S. is important. Think about cost but also what will save you money in the long run. Roof shingles will not last as long as the label says but proper maintenance and care can help you get many years out of them.

Wind mitigation inspections are important to save you money and to make sure your home is up to the standards so it is around for a long time.

What to do about water stains?

You are installing a new light in your living room and suddenly notice there is a water stain on the ceiling!  Oh no!  Fortunately, this does not automatically mean that there is an issue going on, but you will want to investigate it.  Water stains on a ceiling can be caused by many things such as a leaky roof, or if you have a two-story or higher house, could be from a leaky bathroom or radiator (in certain parts of the country).  

It also could be from a one-time event.  Let’s take a look at what to do if you have a water stain on the ceiling.  Including, why this is important, identifying the cause, and how to fix it.  

Why This is Important

Not only are water stains a cosmetic issue, but they can also indicate that there is a leak in the home that needs to be fixed.  Sometimes, this may be the first indicator of a bigger problem brewing or may have been a one time leaky issue.  It is important to investigate to make sure it is under control before you possibly have thousands of dollars in repairs. 

Identify the Cause of the Water Stain on the Ceiling and Where to Start

Roof

It is important to identify the cause of the water stain on the ceiling first so you can fix it.  Start first with the roof to see if there are leaky shingles or missing shingles, missing flashing, or weakened seals around roof vents. You may need to get on top of the roof to look or call a professional to check for you. It is possible that water is coming into the home from the roof.  So you will want to have the professional take a look to see if this is the issue.  

Also, look in the attic to see if there is a pool of water and that will also help you to know if there is water leaking into the home. 

Radiator or air handler on 2nd floor

Radiator or Air Handler on 2nd floor

In colder parts of the country, there may be a radiator on the second floor.  Radiators are used to keep rooms warm in the cold months and do wear out or need replacing. Does the radiator have a pool of water underneath it or any dripping?  If yes, this could be the problem and causing the water stain on the ceiling.  Check the model of the radiator and see if it is something you can do yourself or call a professional to check the body, pipe, and the valve for leaks. 

The same is true for those who have an air handler on the second floor. Did your AC stop working? Or do you see water leaking?  The drip pan (if you have one) on an HVAC unit collects the water and it can become clogged and back up. The float switch (again, if you have one) will activate as soon as the water reaches a certain level and shut down the HVAC unit, thus not allowing the water to continue to flow. Make sure the HVAC doesn’t become clogged and checking this monthly is a good idea.

Upstairs Bathroom Can Cause a Water Stain on the Ceiling

Bathrooms are often the culprit as caulking wears out after about 10 years and needs replacing.  Is the home older than 10 years?  This may be the issue.  While checking the caulking in the bathroom around the sinks, toilets, and shower/bath, also check for black mold in the shower.  Might as well rule everything out while you are looking for the source. 

Other areas to look at are toilets clogging and overflowing.  Do you see water near the toilet on the floor?  This could be the seal is broken on the toilet and it needs replacing.  Also, adding caulk to the toilet to connect it to the floor is a good idea.  If the toilet is continuously running, you can shut off the water and do the water meter test. 

Write down the number on the water meter and then turn off the water for three hours. When you turn it back on, check the number on the water meter.  If it has increased, then you have a leak in the indoor plumbing. 

Taking care of these areas is essential as sewer gases can also be escaping.  Sometimes these issues will soak the ceiling below and clog in sinks and drains in the shower can also cause flooding in a bathroom. 

Pipes in the Walls

Another area is the pipes in the walls.  These can often leak or break without us knowing.  If you found there is a leak with the water meter test above, call a professional to do an infrared thermography inspection. Once you find where the leak came from, fix it, and then cover up the stain with the process below. 

How to cover the water stain on the ceiling

How to Cover the Water Stain on the Ceiling

Unfortunately, there are not too many ways to clean a water stain on the ceiling without using chemicals like bleach. 

1. Put a Drop Cloth on the Floor

  • With goggles on and gloves, put a drop cloth on the floor.  Then, take 3 glasses of warm water and one cup of bleach and mix it together.  Set up a ladder and climb up to the stain.  Use a sponge that is soaked in the concoction to rub it on the water stain to get it to come off.  Take a spray bottle of plain water and spray the stain to get the bleach mixture off.  This is important because you want to be able to prime it and paint it.  Take a dry towel and rub the stain to help it dry faster. 
  • Next, put painters tape around the ceiling if the spot is near the walls. 

2. Apply an Oil Based, Stain Blocking Primer

  • Apply an oil based, stain blocking primer that is mold resistant that matches the ceiling.  It is important to put the primer on first so the paint doesn’t soak into the ceiling.  If you have a flat ceiling, you can use a paint roller with an extension to apply it.  Once the primer has dried, apply the paint.  If you have a textured ceiling, a spray on primer might work better. 

3. Choose a Latex or Alkyd Ceiling Paint

  • The latex ceiling paint is water-based and dries faster than the oil-based paints and also is thicker than wall paint. Make sure that the paint matches the ceiling color. Using a roller, paint it on over the primer and let it dry for up to four hours. Then, apply a second coat and let it dry.  The second coat should make the stain disappear. 

If you want to try removing the stain and not paint over it, here is an idea of how to do that:

When to Call a Professional for a Water Stain on the Ceiling

Call a professional if you find the source of the leak and can’t fix it or if you need help finding the leak. It is important that it is found and taken care of before you move on to priming or painting.  You want to stop the problem before there is a large expense to fix an issue you could have fixed early on. A professional can help you do that and help with any of the areas mentioned above.  Don’t be afraid to ask for help!

Conclusion

Stains on a ceiling are not only a cosmetic issue but also sometimes an indicator of bigger issues lurking on the second floor or roof or in the walls or bathroom. The good thing is a stain can be covered up on the ceiling with bleach, warm water, primer, and paint.

How long do HVAC systems last?

HVAC systems are a necessity in the home, no matter if you live in a warm or cold climate. It can be very expensive to replace a unit so keeping up with the maintenance is important. However, the HVAC, like all things, has a lifespan and there may come a time in which you try to repair it to find out that you actually need to replace it. 

How long do HVAC systems last? About 10-15 years but it also depends on the climate in which you live, especially if you are in a coastal town, if chemicals are used in the home, and how the HVAC unit is maintained. It is expensive to replace so do what you can to get the most out of the unit. 

Let’s take a look at the HVAC system and signs that you may need to replace the unit or repair, the lifespan of various HVAC units, and maintenance to keep your HVAC working. 

Signs Replacing Is Needed

HVAC is Close to 10 Years Old or Older

A typical HVAC unit should last you 10 years of longer. However, this is not always the case. If you fail to maintain your HVAC unit with yearly maintenance, then it is likely that your units lifespan will fail you. The lifespan of an HVAC unit is predicated on the local weather conditions and how much time you invest into maintaining your basic system needs. 

Do you change the AC filters on a regular basis, or even suck out the drain lines on your AC unit? Have you called a professional for yearly maintenance on the unit? All of the answers to these questions will determine the lifespan of your HVAC unit. 

air conditioner repair

Breaks Down Frequently

The most common reason for your AC unit to break down is lack of yearly maintenance. A licensed professional will be able to inspect and identify any troubling situations that might arise prior to the summer months. However, if your HVAC unit is breaking down even after the maintenance schedule, it is a cause for concern. At this point, frequent repairs might be in order. This is way better than a full unit replacement. However, you should start preparing for a replacement unit just in case. 

Electric Bill Has Gone Up….A Lot

Should you notice a dramatic change in your electric bill, you will want to check a few things first. Higher energy bills are often a cause for alarm that your air conditioner is getting old. It may mean that it cannot keep up with the demands of the inside and outside weather conditions. 

Efficiency and malfunctions are the two main causes for your energy bill to rise. If the energy bill has gone up on more than two occasions, it is definitely recommended that you look into the functionality of your system. 

Your A/C Unit Uses R22 Freon

Just in case you were not aware, the use of Freon in an AC unit has been discontinued in the U.S. as of January 1, 2020. What this means for you is if you have an older AC unit that requires a Freon boost in order to maintain proper working conditions, this might cause you to replace the unit. Also, because there is very little R22 available, it is very expensive. Newer models use 410A and don’t need to worry about R22. 

According to the Environmental Protection Agency (EPA), there are huge negative effects to using Freon in the environment. With that being said, it is highly recommended that any person that owns a location with an AC unit that requires Freon should start saving for an AC replacement. 

Here is a video about when to repair or replace the system

Replace or Repair?

A professional can tell you if you are wasting your money on the repairs or if the unit is close to the end of its lifespan. It costs between $3,000- $12,000 to replace an HVAC system. It will depend on the size of your home as to the size of the unit you need. Also, if you are seeing the technician often, think about the amount of money you are spending. 

You may be surprised that by buying a new unit you will save money in the end because it will run better and you don’t need to have an AC company on speed dial. Of course, find out if you need a simple repair. A technician can help you figure out the best route to go, especially if the system is still “young” and has years left. 

furnace is part of the HVAC system

Lifespan of Different HVAC Systems

Furnace

The life expectancy of your furnace is 15-25 years. This is predicated on the proper yearly maintenance of your furnace. A furnace is typically replaced when the heat exchanger starts leaking. Oil furnaces will cause a bigger problem after 10-15 years, if they aren’t maintained properly as well. 

Heat Pump

Your typical heat pump can last you 10-20 years, depending upon the amount of time that you use it. In order to maintain its functionality, it is important to maintain the capability of providing heating and cooling each year. It’s also highly possible that a heat pump that is located in the coastal areas will suffer an earlier breakdown due to the salt air and weather conditions. 

Boiler is part of the HVAC system

Boiler

Your boiler is typically only replaced when the heat exchanger is leaking. Most boilers will last 20-35 years. 

An HVAC that needs replacing

Air Conditioner

The air conditioner will typically last you 15 to 20 years depending upon your maintenance schedule. The issue with your AC unit is typically when the compressor fails or the condenser develops corrosion and begins to leak. Unfortunately, in more coastal areas, the AC units begin to fail at a faster rate due to weather conditions and salt air. 

However, if you live on the beach in Florida, it may last only 5 years! 

Factors That Affect the Life of the HVAC 

Air conditioner freezes up – if this happens, it may be due to lack of airflow, broken or crushed duct, dust on the coils, or low refrigerant to name a few. 

Blower Motor – this can go bad if you hear strange sounds, there is overheating, or weak airflow. You will want to call a professional if there are any issues. 

Replace the air filter

Maintenance of the HVAC

Replace the Air Filter – you will need to replace the air filter every 1 -3 months depending on the environment in your home. This means, if you have dogs, or someone who smokes, you may need to change it every month. If you don’t, you may be able to do it every 3 months. Take a look at it each month and if it starts to look clogged, it may be time to replace the filter. 

Clean Around the Unit – make sure grass and plants are not growing into the unit. This can cause the unit to break down. 

Condensation Line Needs Cleaning Out – You can do this every month: Add ¼ cup vinegar to the drain.  Next, let it sit for 30 minutes, flush it out and it should clear.  This will allow it to kill harmful bacteria, sludge, mold, and algae.

Adjust the Thermostat– always keep the temperature inside the home cooler than it is outside the home. 

Other Areas for Maintenance

Attic

You want to help keep your home cool so the HVAC systems don’t have to work as hard in the summer. One way to do this is to keep the attic cool. Keeping the attic cool can be done by having enough insulation in the home, light color shingles, sealing cracks, and shade landscaping to name a few. 

When to Call a Professional 

It is imperative that you call a professional to check on your HVAC unit when you hear strange noises. It is recommended that you also utilize a professional HVAC service at least twice a year to do maintenance and a system checkup. Failing to do your yearly maintenance can cause the system to break down and cost you a lot of money in the long run. 

Conclusion

The HVAC systems in a home are the most vital parts of you living comfortably in the heat and cold weather conditions. Although most HVAC systems last 10 to 15 years, it is important for a homeowner to maintain the system. It is far more costly to neglect the HVAC system in a home, and much smarter to maintain and save money on a yearly basis.

Can a house collapse from foundation issues?

Imagine coming home from the grocery store and while you are pulling into the driveway you notice a crack in your home exterior wall. After you put your groceries away, you head back outside to check. The first question that comes to mind is, can a house collapse from foundation issues? The answer is yes, however, it is also not that simple. It can take years to develop a serious foundational issue that would cause your home to collapse. In most cases, if it does, it’s concentrated on a specific area of the home.

Let’s take a look at some ways to notice the beginnings of foundation problems with your home or if it is simple home settling. 

Major foundation damage

What Does It Mean To Have Foundation Issues

Most people will assume that foundation damage or issues are a dangerous aspect of a home. Although there are some inherent risks, it doesn’t necessarily mean that your house will collapse. You can live in a home with foundation issues, but you want to have them checked. 

Many people do and often have no idea of any problems. This is simply because these issues can take time to develop. 

Unfortunately, when a foundation shifts, it can lead to the following foundation problems: 

  • Uneven flooring
  • Doors and windows are no longer level and becoming jammed
  • Interior and exterior walls are cracked
  • You will experience mold and water damage and want to be careful if you buy a home with these issues. 

Will My House Fall Down

First off, it is not very likely that your house will collapse completely from foundation issues. However, it is possible that a section of your home could have major structural damage, which can lead to the breaking of pipes in your plumbing and possibly electrical issues. Fortunately, some clear indicators will warn you before any major damage occurs. Let’s take a look at those warning signs 

  • Your home will have cracked walls in the exterior of the house, which is clearly visible on stucco or block
  • The windows and doors will stick- resulting in them not opening or closing as easily
  • You will notice cracks in the drywall around those door frames and window frames
  • Some long cracks or bowing in the basement/crawl space/attic walls

Compare Stucco Cracks vs Structural Cracks

Stucco Cracks

It is always a good idea not to panic when identifying cracks in your exterior walls or foundation. Stucco cracks can be repaired and don’t necessarily mean that your foundation is falling apart as this typically means that your home is settling and shifting. 

If you notice a wall crack, be sure to seal it as soon as possible with an elastomeric caulk. The caulk will stop any moisture from getting inside the wall. Also, many people do not realize that the wall, has a metal rebar, and as metal gets wet, it rusts, oxidizes, and expands which makes the issue worse! Sealing the cracks as fast as possible is highly recommended. 

Structural Cracks

Structural cracks are listed in the section above. So, understanding the little messages that your home will communicate to you while settling is an important note. Learning about when your windows or doors start sticking, and observing long cracks in your exterior or interior walls will tell you how your home is settling. 

Many structural issues are more common in older homes. This is typically due to a lack of home maintenance. However, this does not say that new construction homes do not have structural problems too! 

How Long Will It Take To Make Repairs

The time that it will take to repair any foundation damage depends on the size of the home and the extent of the damage. For the sake of estimating your time needs, here is a list of the top repairs that occur and how long those take: 

  • Crack repairs – these could take several hours for materials used to dry and take hold.
  • Bowing walls – could take several days due to materials needed and the time it takes to fix.
  • Piers – take up to a week due to size and complexity.
  • Size of the home – a small home foundation is a quicker fix. 
  • Materials used – pouring new concrete takes a lot of time to dry vs. patching with other materials.
  • Amount of damage – sizable damage to the foundation requires a lot more time to fix. 
  • The time of year – is the ground frozen where you live? Or is it summer and great conditions? 
Foundations can cost a lot of money
Foundations cost a lot of money

How Much Will It Cost Me To Fix

Foundation damage can cost around $3,500 for small crack foundation repair but can cost as high as $40,000 and beyond if there are major repairs needed. The more expensive repairs typically occur if the basement wall has damage or there is a large crack in the foundation so hiring a residential structural engineer is always a great idea. This costs around $500 or about $100-$200 per hour.

Let’s take a look at the video below to see how we can determine if the damage is just simple house settling or a larger problem with foundation damage. 

Other Ideas To Think About

One area that you might want to consider when working on the foundation issues is determining how long will it take for a house to settle? This will allow you peace of mind that any vertical exterior wall cracks could be a result of the house settling and not the house collapsing. 

Another area that you might want to consider when working on the foundation issues is how long does a home inspection take? This will allow you to prepare for time and finances. Having a full home inspection will give you information about how bad your house foundation damage might be and what you can do to fix the damage. 

If your home has vinyl siding, make sure you are maintaining it.  Vinyl siding lasts about 20-40 years, and you can keep it clean by rinsing it off with a hose or pressure washer. Also, taking a look at the siding after storms is a good idea. 

foundation damage to a brick home
Foundation damage to a brick home. 

When Should I Call A Professional

The moment that you notice cracks in the walls or concrete slab of your garage or damaged foundation you will want to contact a professional. Also at this time, it is a great idea to call your local home inspection company and a residential structural engineer. Together they can assess the damages and determine the structural integrity of the home. 

Conclusion

Understanding what the issue is with your foundation is the first step in getting repairs or fixes done. The slab foundation or foundation wall might be damaged or your house settling might have just caused some vertical cracks to your stucco, brick, or block home. Regardless, of the why, you will want to get a residential structural engineer and a home inspection team out to your home to determine the best solution.

What is a double tapped breaker?

Considering the fact that you rarely look at your circuit breaker box, means you are likely not familiar with it. Breaker boxes are made in a variety of ways and have coding that is required that the electrician follows when installing wiring. Making sure that you do not have wires incorrectly installed is important to avoid fire hazards. What is a double tapped breaker? When two wires are placed in one circuit breaker that otherwise isn’t built to house two wires. 

Let’s take a look below at what the problem would be and how you can fix it. 

Why Are They A Problem

Most circuit breakers are not designed to hold two wires at the same place. If you come across this scenario in your home, you need to call a professionally licensed electrical contractor right away. Leaving two wires in a breaker that is not built to handle the load will result in a fire.

Two wires that are connected to the same breaker or terminal can result in overheating. You could also notice the two wires producing arcing due to not being attached tightly enough. Luckily, there are solutions to fixing this scenario and there are some breaker terminals that are now built to handle two wires at once. Let’s take a look below at the solutions to two wires in one breaker.

Double tapped breaker.
Courtesy of Waypoint Inspections

How Do You Fix a Double Tapped Breaker

Believe it or not, there are a variety of ways that you can fix a double tapped circuit breaker. Keep in mind that some breakers are meant to hold two wires. Let’s review.

  • Pig Tail-this is done when you connect the third wire to the breaker after you have wrapped the other two wires together with a wire nut and have all three wires as one.
  • Tandem circuit breaker-a square d tandem breaker is built to house two wires in the same breaker. There are two connection points for two wires.
  • Breaker designed for wires. Square d and cutler hammer have breakers designed for holding two-wire connections.
  • Just add another breaker-if you have room in the breaker box, you can simply install a single circuit breaker to an open slot on your electric panel. This is cost-effective and relatively easy to do. Single breakers cost less than $5.

Keep in mind that your breaker panel cover will determine what you can and cannot add. Yes, there are breakers available for two-wire connections, however, you must make sure that the breaker is installed in the slow designated on the label of the breaker box. Following the breaker, box rules keep things easy and functional.

How Much Do They Cost

The cost to add a circuit breaker to your breaker box ranges from $40 to $60 plus the labor charge. Typically, you are looking at $150 for the job. It takes most electricians 2 hours to install a new circuit breaker to your breaker box. Anytime you need to get the breaker fixed, you should expect to pay $150 to $250 to fix a double tapped breaker. 

When you are learning about double-tap breakers go ahead and also educate yourself on what the wiring should look like for your electrical system. Bootlegged grounding and bad wiring hookups happen more often than you think. It would be a great idea to make sure that you pay attention to any contractor work being conducted on your electrical system. Make sure you are hiring a professionally licensed electrician. 

Another area to check is the breakers to make sure you don’t have a Challenger GFCI breaker. If your home was built between 1998-2004 there is a chance you have these. Contacting an electrician is the way to go if you find this or need assistance. 

Electrical fire in a home.

Lastly, you want to know what kind of wiring you have in the home. One type you do not want to have is aluminum wiring. This is because it is connected to copper wire and can start an electrical fire

When Do I Call A Professional

Anytime you are dealing with your electrical system and more specifically your circuit breaker box, you need to call a professionally licensed electrician. It is not recommended that you attempt to make any changes to your breaker box, even if you read up and study up on the process of installing a double tapped breaker. You might feel the need to save time and money and complete it as a do-it-yourself project.

However, dealing with electricity is not the easiest or safest project to do on your own. You might want to consider calling on your local home inspection team so that the home inspector can conduct a thorough inspection of your electrical system. Typically, they will look for loose connections, common defects, and go over the electrical work. They can also recommend the most reputable professionally licensed electrician in the area.

Conclusion

Getting a professionally licensed electrical contractor to come out to your home could be a difficult task. The most reputable companies are almost always booked for weeks if not months away. So, planning ahead is an important step here. Getting your double tapped breaker installed is a project that you won’t want to complete on your own. Call your local home inspection team to get a few referrals for the most reputable professionally licensed electrical contractors around. While they are out at your home, they can conduct a full home inspection. This will allow you to add any extra projects to the list while you have the electrical contractor.

Tools of the Home Inspector trade.

If you’ve ever hired a home inspector and were present for the inspection, you may have looked at his/her tool bag with interest. Inspectors carry and use all sorts of useful gadgets, thousands of dollars worth! The right tools are necessary for conducting a thorough, top-to-bottom inspection of a home. In this article, we’ll discuss this subject in detail, and help you understand a few of the common home inspector tools of the trade used to examine and evaluate homes.

Gas Leak Testers

There are a variety of gas leak testers available for home use, but home inspectors use high-quality, professional-grade gas leak testers, which are extremely sensitive and can detect even the smallest gas leaks. The gases typically tested for are natural gas and propane.

Gas leak testers are used wherever there is a gas line – to test for leaks near combustion appliances like furnaces, water heaters, gas ranges and ovens, gas fireplaces, and other such devices. Gas leaks can be dangerous and elusive, so proper recognition and detection of a leak is a key element of any home inspection.

Gas Leak Detector

CO Detectors

CO (Carbon Monoxide) detectors are used to detect even the smallest levels of carbon monoxide in a home. These handheld devices are used to ensure that there are no harmful levels of carbon monoxide in a home, which may otherwise be overlooked because carbon monoxide is colorless and odorless. CO is primarily created by central heating systems and other household appliances that use gas, wood, or coal as their source of power.

CO Detector

Outlet Testers

Outlet testers are small devices with an electronic readout, which are plugged directly into power outlets to check their functionality – and verify that proper voltage and power is flowing through the outlet. Inconsistent or improper readings may indicate wiring or electrical issues, which may require further testing and examination.

Outlet Tester
Outlet tester 2

Non-Contact Voltage Testers

These devices are used to test wires, cables and other electrical equipment to check if the wire is “live” and has electricity flowing through it. This is useful for ensuring safety when checking electrical systems. It can also be helpful when finding opened spliced wiring or older wiring to ensure it is no longer active.

Moisture Meters

Moisture meters are used to help diagnose a wide variety of issues and detect things like leaks in the roof, leaks in plumbing systems, moisture in the walls, potential mold growth, and more. Moisture meters use a special electrical system, which can detect changes in resistance and electromagnetic signals, to determine if there is moisture present in a wall or another area.

moisture meter

Ladders

Ladders are needed to access the roof, attic spaces, and high ceilings.  Many inspectors use compact ladders, such as the Telesteps brand telescoping ladder.  Telesteps ladders are collapsible, lightweight ladders that can be extended to multiple heights, making them a versatile tool for a variety of scenarios, while also providing a compact design for portability.


Thermometers and IR cameras

Inspectors may use a variety of different types of thermometers for a variety of tasks.  Infrared thermometers are useful to measure the temperature at HVAC systems.  Digital readout thermometers or simple probe thermometers are useful to measure both domestic hot water temperature and air conditioner temperature drops.

An infrared camera may also be used, to help make an energy efficiency assessment. IR cameras can help gauge the insulation levels in finished walls or ceilings and can be useful to determine if there are any significant voids or gaps in insulation that is otherwise not visible. IR cameras can also be used to pinpoint or inspect for moisture, as temperature differentials visible on surfaces can indicate an area that is wet. We currently utilize Flir IR Cameras.

thermometer
digital IR thermometer
infrared camera


Various other hand tools

Inspectors will also carry a variety of other hand tools to aid them in their inspection, which serve more straightforward purposes. Flashlights, measuring devices, multi-purpose screwdrivers, water pressure gauges, levels, and various other hand tools are all important in the home inspection process.